Volleyball rotations: the six 5-1 rotations zone by zone
Updated October 5, 2026
A rotation is the order in which the six players stand in the zones at the moment of the serve. The 5-1 system has six rotations, and each one puts a different set of hitters at the net. This page covers when a team rotates, a diagram of every rotation, and what players do right after the serve.
How rotating clockwise works
A team rotates only when it wins a rally on the opponent's serve (FIVB 7.6.2), also called a side-out. Win a point on your own serve and you stay put — the same player serves again. Lose a rally and you stay put too: the serve goes to the other team.
When the team rotates, all six players move one zone clockwise:
- zone 2 to zone 1 (this player serves next),
- zone 1 to zone 6,
- 6 to 5, 5 to 4, 4 to 3 and 3 to 2.
Zone numbers run counter-clockwise while players move clockwise, so each player's zone number drops by one (zone 1 wraps to zone 6). In the trainer the rotation number is the setter's zone, so over a match the rotations come in the order 1 → 6 → 5 → 4 → 3 → 2 → 1.
Be careful when comparing with other sources: many coaching materials number rotations in the order the team plays them rather than by the setter's zone. There "rotation 2" means the setter in zone 6, not zone 2. Only rotations 1 and 4 match, so always check where the setter is.
Volleyball rotation diagrams: all six 5-1 rotations
In every diagram the net is at the top, the front row is zones 4, 3, 2 and the back row is zones 5, 6, 1. The setter is highlighted.
Rotation 1: setter in zone 1
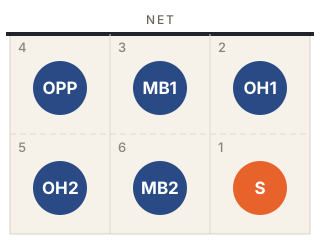
The opposite, middle 1 and outside 1 are at the net — three hitters. The setter is right back, the closest back-row spot to the target.
Rotation 2: setter in zone 2
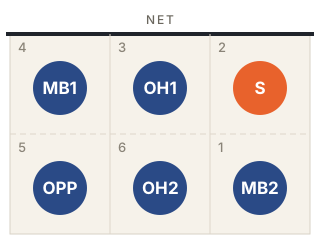
The setter is front right, so only two hitters are at the net: middle 1 and outside 1. The opposite attacks from the back row. Middle 2 is in zone 1 and serves on your own serve (see the libero note below).
Rotation 3: setter in zone 3
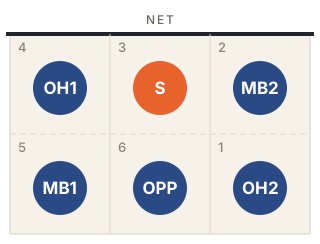
The setter is in the middle of the net between outside 1 and middle 2 — again two front-row hitters. After the serve, middle 2 moves from zone 2 to the middle and the setter goes right.
Rotation 4: setter in zone 4
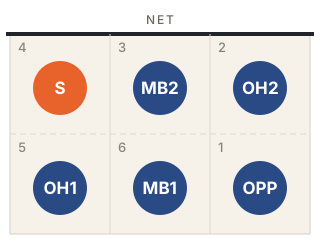
The setter is front left, as far from the target as it gets: a run along the whole net. Two hitters at the net, middle 2 and outside 2; the opposite is in zone 1.
Rotation 5: setter in zone 5
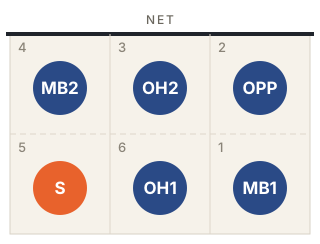
The setter has moved to the back row, so three hitters are at the net again: middle 2, outside 2 and the opposite. The trade-off is the setter's longest run from the back row.
Rotation 6: setter in zone 6
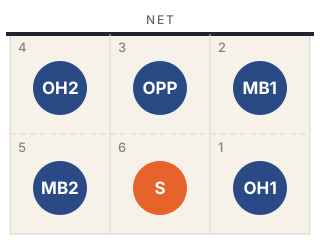
Three hitters at the net: outside 2, the opposite and middle 1. After the serve the opposite moves from the middle to the right side and middle 1 from zone 2 to the middle.
In short: in rotations 1, 6 and 5 the setter is in the back row and three hitters are in front; in rotations 2, 3 and 4 the setter is in the front row and only two hitters are.
With a libero, the libero replaces whichever middle is in the back row. When that middle reaches zone 1, under FIVB rules the middle serves: the libero may not serve. In recreational games the libero often serves anyway — that is common practice, not a rule; the trainer's default "Amateur" rule set models it.
Switching after the serve
The rotational order only matters at the moment the server hits the ball. Once the ball is served, players switch to their playing positions — in the trainer this is the "With switching" scheme:
- setter — to the right: at the net to the target between zones 2 and 3, in the back row to zone 1 for defence;
- opposite — to the right side: zone 2 at the net, zone 1 in the back row;
- middles — to the middle, blocking from zone 3; the back-row middle is usually replaced by the libero;
- outside hitters — to the left side: zone 4 at the net, zone 6 or 5 in the back row, depending on the team's system.
This is a switch, not a rotation: nobody's place in the order changes. On the next serve each player is back in their own zone and has to respect the order again. When receiving, the rotational order applies until the server's contact; on your own serve, since 2025, the team can start in its playing positions straight away, because the serving team cannot commit an overlap.
Common mistakes
- Moving before the serve. The most frequent receive error: the setter or the opposite starts toward their position before the server hits the ball and passes a neighbour. That is an overlap (rotation fault) and the opponent scores. Who is compared with whom and how the referee judges it is explained in the volleyball overlap rule article.
- Rotating the wrong way. Rotation is clockwise: the player from zone 2 goes back to serve, not the player from zone 6.
- Rotating after your own point. If you win a rally on your own serve, you stay in the same rotation.
- Treating the zone as a spot on the floor. A zone is a place in the order. A player who ran to the left side after the serve is back in charge of their own zone on the next serve.
Place your player in every rotation and phase of the rally in Training mode — the trainer checks the line-up and shows you if it breaks the order.
Read next
- Volleyball 5-1 rotation explained: positions and rolesWhat the 5-1 system is: one setter, an opposite, two outside hitters and two middles — where each stands and why teams play it.
- Volleyball overlap rule: what is a rotation faultWhen the referee calls a rotation (overlap) fault: which players must stay in order before the serve, how feet are judged and what it costs.